|
Your AudioReality.com Stealth recording microphones... |
||
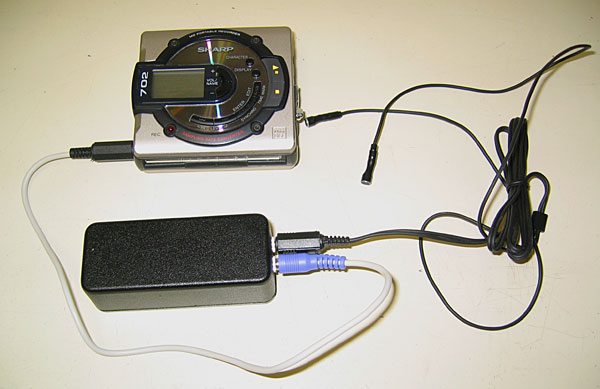
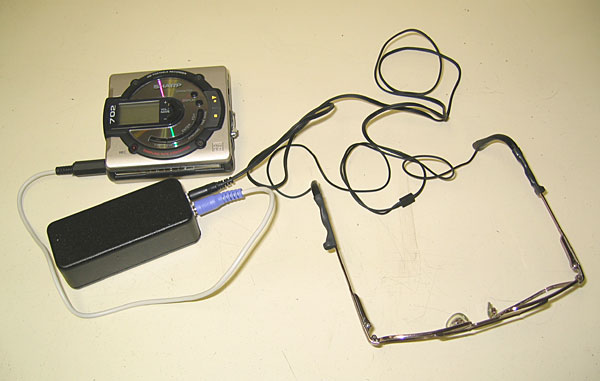
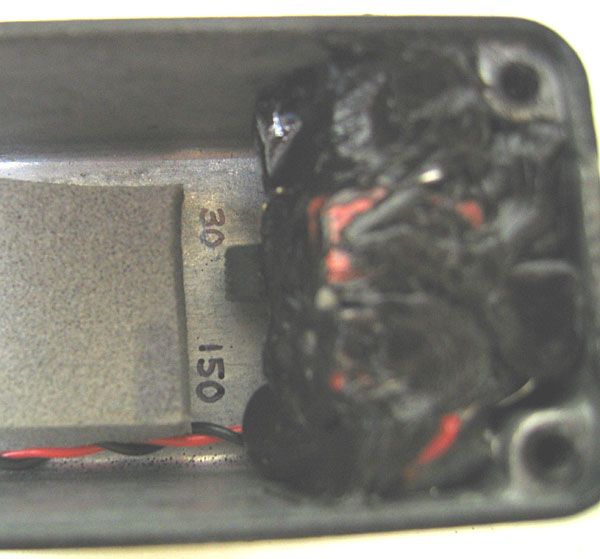
| DESCRIPTION The two mic cartridges are contained in a durable shrink sealed cable strain relief. They are loose and can be mounted in any number of ways, see the picture of the eyeglasses for one idea. Black masking tape (known as gaffer’s tape) is great for fixing the mics to various firm supports. If you envision mounting them in a hat or in hair, use the tape to fasten the mics to a small bobby pin or safety pin. For binaural recordings the mics are placed near the ears and aimed outward rather than forward. This captures sound just as the ears would and results in a quite startling stereo image when played back through earphones! A more typical stereo image results if you move the mics a bit forward of the ears almost to the plane of the front of the head and aim the mics forward. experiment with mic placements to see what you like best. If you have the luxury of being able to openly record, fix the mics on a firm rod as far apart as they cable allows (you can cut the little plastic cable block that splits the cable ends to allow greater distance between the mics if you like, but be careful not to nick the wires!). Greater separation gives a wider stereo image but only if you play back over widely spaced speakers. I have found that just separating the mics by the two feet that the cable allows results in great sound, so try that first before you go slicing and dicing! HOW THEY WORK I use a pair of nice quality electret condensor elements in the audioreality.com stealth mics. These tiny elements are not unlike the condensor mics found in recording studios and radio stations, the difference being that they do not require a high voltage to charge the condensor plates. They use a prestressed and permanently electrically charged very very thin plastic film. This diaphragm is both low mass and resonance free, but is very high impedance and any load whatsoever will crush down the output to zilch! Thus there is a tiny internal FET transistor to allow the element to drive suitable loads. Generally a few volts of bias is used, fine when recording speech from a conference, but just plain hopeless when exposed to loud music. The battery box is used to provide a higher voltage to the mic elements for vastly improved dynamic range. Also inside of the box is a selectable high pass filter (bass roll-off filter) which is used to extend the dynamic range further as well as limit the typical ‘boomieness’ that is prevalent in many live recordings. Dynamic range is improved since loud, low bass frequencies can ‘soak’ up headroom. Mic elements are matched for level and selected for best dynamic range under increased bias. There are two settings of the high pass filter: 30 Hz and 150 Hz. For most cases, use the 150 Hz setting since that will provide best response in the majority of live concert recording situations. If, however, you have a small local club with great acoustics, or are recording in a quiet conference room, you can select the 30 Hz setting. These corner frequency points are accurate for most recording devices with an input impedance above 10K ohms. The battery will last hundreds of hours and there is no ON/OFF switch - disconnecting the mics from the box automatically unpowers the unit. after every recording session, simply unplug all connectors and that will power down the works. HOW TO USE THEM You can immediately try out your mics and get some experience with them while in your home. Practice setting record levels and connecting them up so you know it cold - doing all that under the pressure of a live concert with all the distractions can be frustrating! At the concert venue, you will generally use the “Low” mic sensitivity level setting, you’ll be amazed at how much louder the sound is there from your experimental recordings you did at home! With current digital recorders, it is far better to record at too low a level than at too high! Your VU meter should be reaching the 0 VU point only on very loud passages - never hitting that level all the time. I have found one of those little LED pocket keychain lights great for lighting the display on the MD recorder while setting levels. Remember, opening acts are for setting levels and getting all the gear in order! If you have any cool stories or tips for other tapers, be sure to let me know and I’ll post them on the web site or print them in future instructions! Thanks for buying these mics and great taping to you!!
|
 |
|
 |
||
 |
||
|
||